
Please note: Growatt has discontinued sale in NZ of these battery hubs. GridFree no longer stock any Growatt products.
Hey, guys, today we're going to set up a battery hub.
On our larger systems, you generally have more than one inverter or one ARK lithium battery stack. For those cases you want to go with a battery hub. With this battery hub today we're going to set up two inverters and two separate battery stacks. The battery hub can handle up to 32 individual lithium batteries. And with this type of inverter, you can go up to six in parallel.
So the first thing you need to do is set up your battery stacks. We're going to demonstrate on this one here how to set that up. These stacks can be up to ten high, today we're just using two. Each battery stack requires its own base
and its own wiring. With each battery box comes its wiring. The absolute first thing you need to do is to set up the battery stack, stack it all on top of a base. The next thing, make sure the breakers at the back of each battery are turned off.

Then take all the battery caps off the power terminals. Then you can take out all the tabs between the batteries. You can also take the top one off if you would like to, depending on how you're going to route it.

So chuck in your battery link cables like this. Make sure when you are putting these terminals in to push them in all the way until you hear a click.

So the next thing you want to do is plug in your communications cables. The first lot of these go between each battery. From the 'link out' to the 'link in' of the battery below, all the way down the stack. The next communication cable is for the whole stack. This is going to go in the 'PCS' port of the top battery. The top battery is your master battery. This cable is going to be routed up to the battery hub.

Now we're going to wire the power cables that go up to the battery hub into the battery stack. The positive always goes into the top battery and the negative
always goes into the bottom battery. These run up to the battery hub. Once you've done that, the battery wiring should look just like this.

Repeat this for all the battery stacks you have, and then we'll move over
to the battery hub.
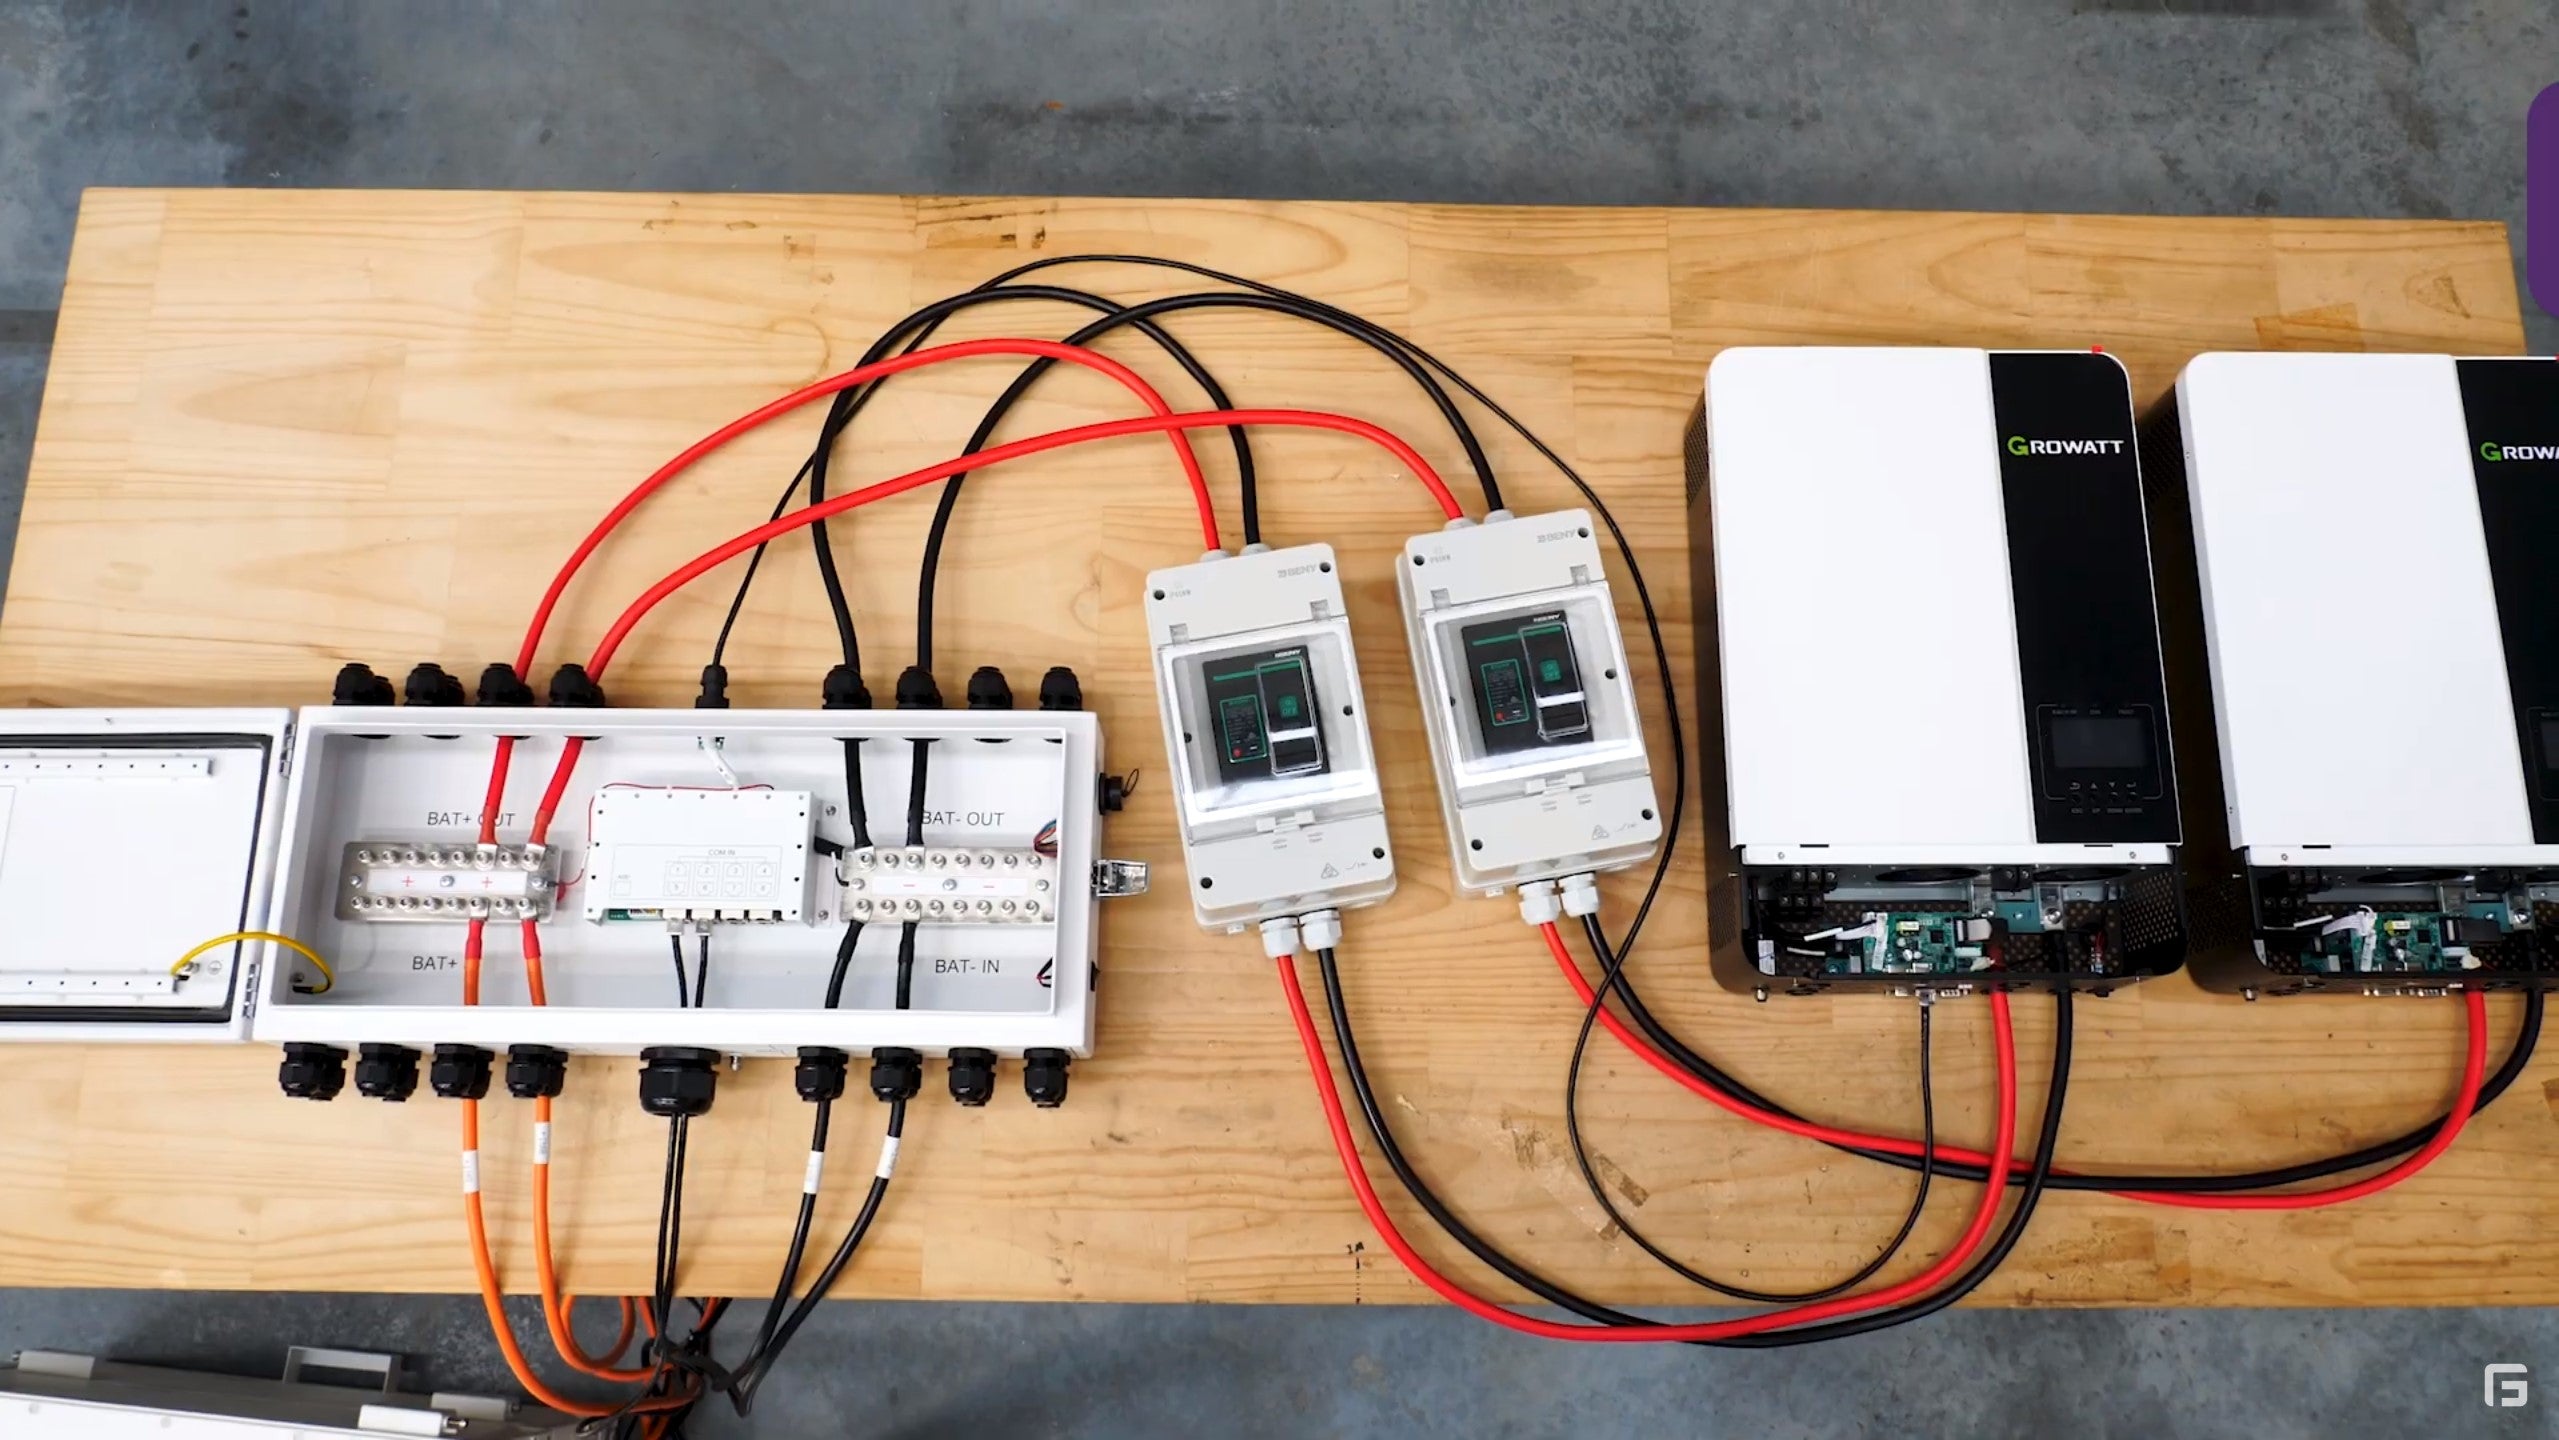
Next we going to wire the battery stacks to the battery hub. All the inputs from the battery come from this side. You've got your power cables coming in
and your communications cables coming in from each stack, from power cables come in to busbars and the communications cable come through in the centre here.

These all combine into 'comm-in' port, these all turn into one 'comm-out',
which goes to one of the inverters. The inverters through MCCB's will also run from the busbars.

For this example, we have two stacks of batteries and two inverters, hence two of each pair. A good reference for the circuit is available on the inside of the battery hub door.

If you're looking for the battery hub switch just around the corner here.

Next, we're going to move on to the inverters. When you wired them to the battery hub, they should look like this. 
You've got your power cables coming in from the MCCB both of them, and a communications cable coming into one of them.

So the next step is setting up your inverters for parallel operation. Before we go any further, just make sure to double check all of the switches on all of the different components are off. So this would include the breakers on the back of your batteries, the inverters, the MCCB's and the battery hub.

So once you've made sure all the switches are off, you can do the parallel communications wiring between the inverters. This will be done with a pair of gray cables and a pair of red and black cables. These are included in the inverter sets.

For two inverters you're simply going to wire directly into the other one. For more than two inverters, check the manual, this will show you how to do that. With these inverters, you can wire up to six in parallel.

So once you've set up the communications cables, we need to program these inverters. Before we do that, we need to follow the correct startup process.
First turn on the MCCB's, then turn on the battery hub, then go around to the back of the lithium batteries and turn all of the breakers on. Then go around to the front, hold one of the silver buttons on the stack, on the top battery. Some lights will start flashing, wait about 20 seconds for all of the batteries to boot up.

Finally, you can move back to the inverters and switch them on. Now the inverters are turned on and we're going to go over to the screen and I'm going to show you how to program them for lithium batteries.

So the first step in setting up your lithium batteries is to hold enter, this takes you into the settings menu. Navigate to program five, the program number's on the right. Press enter to go into that setting, now scroll until you get to L.I. This is the Lithium setting, press enter to confirm that.

This is going to take us to program 36, press enter to go into that setting. Now we want to change this number here to 'L 51'. Press enter to confirm each digit. Now that we've got L 51 we press enter and now escape to confirm the setting.

To make sure you've set this up correctly, look for the little 'LI' next to the battery icon here that will tell you you've got the lithium sitting active. You only need to set the setting once and it'll set on both inverters. You should make sure there is an 'LI' on the other inverter as well.

Now that we've done the lithium battery settings, we're going to do the output settings. You need to set these inverters into parallel output mode before connecting the AC wiring. To set up the parallel output, you need to do this on every single inverter. First, turn the inverter off. When the beeping stops, hold, enter. And now this time we're going to scroll to setting 23. Press enter. We're going to change this to 'PAL', now we're in parallel mode. Press Enter and press escape.

The beeping you hear is normal. This will continue until you set up every single inverter to the same setting. Repeat the same settings process for the other inverter.
So now you've set up the inverters for a parallel output. Make sure they stay off
and turn off the MCCB's, and then turn off your batteries and battery hub with no power connected to them. It's now safe to start doing the terminal wiring for the AC output and input.
If you're unsure about any steps in this process, to make sure you don't damage
any of the equipment, please get in contact - we're more than happy to help.